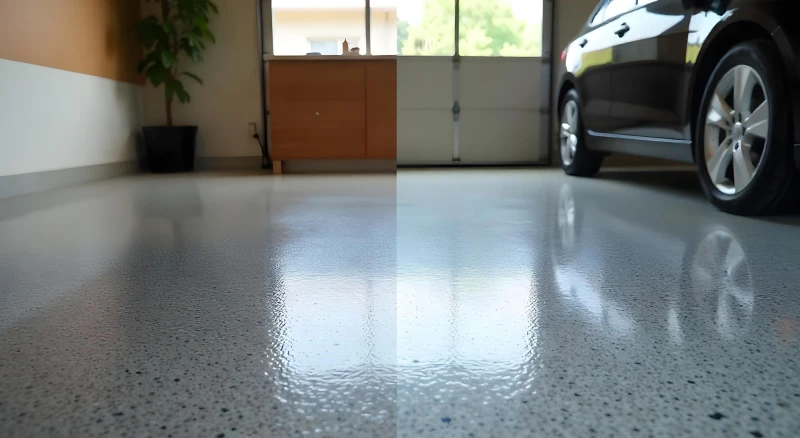
If you’re looking to upgrade your garage, installing an epoxy floor is a fantastic choice. Not only does it enhance the appearance of your space, but it also provides a durable, stain-resistant surface. This step-by-step guide will walk you through the installation process, whether you’re a DIY enthusiast or considering hiring a professional.
Step 1: Gather Your Materials
Before you begin, ensure you have all the necessary materials:
- Epoxy Kit (resin and hardener)
- Concrete Cleaner or degreaser
- Concrete Repair Compound (if needed)
- Grinder or Diamond Grinder
- Paint Roller and Tray
- Squeegee
- Masking Tape
- Protective Gear (gloves, mask, goggles)
Step 2: Prepare the Garage Floor
Proper preparation is crucial for a successful epoxy installation. Follow these steps:
- Clear the Space: Remove all items from the garage, including vehicles, tools, and storage.
- Clean the Concrete: Use a concrete cleaner or degreaser to remove dirt, oil, and grease. A pressure washer can also be effective. Allow the floor to dry completely.
- Repair Cracks and Holes: Inspect the concrete for cracks or damage. Use a concrete repair compound to fill any imperfections, ensuring a smooth surface for the epoxy.
- Grind the Surface: To enhance adhesion, grind the concrete surface with a diamond grinder. This step is essential for removing any old coatings and providing a rough texture.
Step 3: Mix the Epoxy
Carefully follow the manufacturer’s instructions to mix the epoxy resin and hardener. Make sure to mix enough for your entire garage floor, as the epoxy sets quickly.
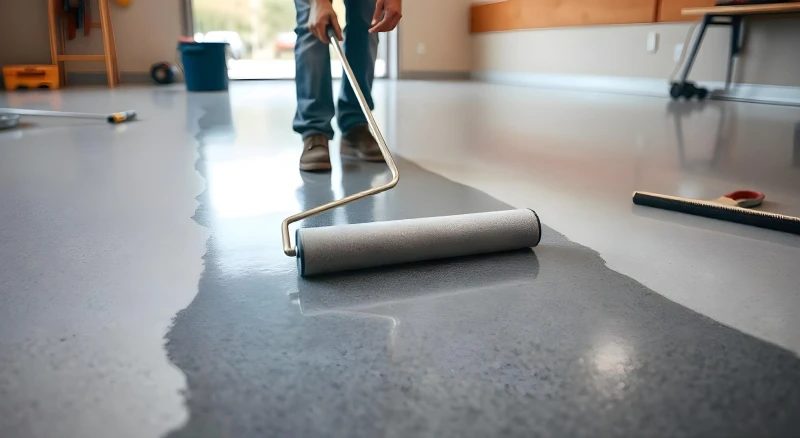
Step 4: Apply the Epoxy
- Start in a Corner: Begin applying the epoxy in a corner of the garage and work your way towards the exit to avoid stepping on the wet surface.
- Use a Roller: Pour the mixed epoxy into a paint tray and use a roller to apply an even coat across the floor. A squeegee can help spread the epoxy more evenly, especially in larger areas.
- Add Decorative Flakes (Optional): If you want a decorative look, sprinkle color flakes onto the wet epoxy. This adds texture and can enhance the appearance of your garage floor.
Step 5: Allow to Cure
Once applied, allow the epoxy to cure according to the manufacturer’s instructions. Typically, it will take 24 to 72 hours to fully cure, depending on the temperature and humidity levels. Avoid walking on the floor during this time.
Step 6: Finishing Touches
After the epoxy has cured, consider applying a topcoat for added protection and shine. This is especially beneficial if your garage experiences heavy use or exposure to chemicals.
When to Hire a Professional
While DIY installation can be rewarding, consider hiring a professional if:
- You’re Uncertain About Preparation: If your concrete has significant damage or requires extensive repairs, professionals can ensure a proper foundation for your epoxy floor.
- You’re Short on Time: Professional installation can save you time and guarantee high-quality results, allowing you to enjoy your new floor sooner.
- You Want a Flawless Finish: Experienced installers have the expertise to achieve a perfect application, minimizing the risk of mistakes.
Installing an epoxy garage floor can dramatically enhance your space, offering durability, aesthetics, and easy maintenance. By following this step-by-step guide, you can achieve professional-looking results, whether you choose to do it yourself or hire an expert.
Ready to transform your garage with an epoxy floor? Contact us today for high-quality epoxy solutions and professional installation services!